Showing posts with label egg. Show all posts

Sunday, September 23, 2007

Toad in The Hole


I've been thinking a lot about toad in the hole. Either this represents a new thought disorder or it means that I'm stuck in the house with hungry children while the lovely wife is at the gym. Although likely a bit of both, I will defend myself by pointing out that she is out of the house as I write this.

For those of you who don't know, toad in the hole is a fried egg cooked in a piece of bread with a hole ripped out of the middle. It sounds easy enough until you do it a few times. Then you realize the variations on toad in the hole: toad and a hole; blackened toad; blackened hole; and, my favorite, sushi egg ala salmonella. Making it right is not as easy as it sounds.

For those of you who would say something like "just use a thick piece of brioche: that will hold the egg and cook nicely" I say "the seven year old is hungry NOW and will not wait. I will use the Arnold Brick Oven White that sits in the drawer. Anyway, I've tried it and brioche tends to burn easily.

So I have set out to make the perfect toad in the hole using commercial bread products. For better or worse, certain people under the age of 12 seem to prefer this bread anyway. There are several things to keep in mind
  • do not be skimpy with the oil, and use oil over butter as the latter burns.
  • Use fresher eggs! The yolks are much more durable. Save the old stuff for scrambled.
INGREDIENTS

Slice white bread with 1 1/2 to 2" hole taken out of the middle
large egg
olive oil
salt to taste

EQUIPMENT YOU WILL NEED

Good spatula
Good small frying pan with cover

INSTRUCTIONS

Heat the oil in a medium hot pan. Quickly put the bread in the oil and turn, making sure it is covered on the face up side. Crack the egg into the hole. Much of the white will pool on the top of the bread. Cover to let the top cook a bit, too.

The trick is to flip the bread/egg combination as soon as possible. Peak under the toast and when it looks more than a bit "golden" flip away. The flipped side, being covered in egg, is much less likely to burn and can be cooked longer. Again, covering will help it cook through a bit. Boy #2 likes his toads sunny and Boy #1 likes them well done. Both can be accommodated with this technique. If you're worried about burn, flip again and cover. Salt to taste.

Monday, November 13, 2006

Back From Mexico


Did you miss me? The lovely wife and I were in beautiful Carmen de Playa for four days of fun and sun. Unfortunately, we did not encounter much gourmet Mexican dining, although we did like a lot of the breakfasts; some of which I will try to recreate. However, if you include breakfast, I did discover several dishes which I would like to learn more about. The first of these is lime soup, which I was told was a traditional Mayan dish. It is a chicken soup in a lime base, and contained dried tortilla shreds and vegetables. There was a strong hint of coriander, which I am not normally a fan of but which was really good in this soup. We both enjoyed the sopasitas, little corn pone tarts covered in shredded pork, beef or seafood. The best breakfast was huevos Montulenos (pictured), but closely followed by Huevos con Epazote y Chile. While the former was not very different from huevos rancheros, the latter was sort of a frito pie for breakfast, featuring fried eggs, tortilla chips chile sauce and white cheese. Scarily tasty.

Like most beautiful and tranquil resorts, the food at the place the LW and I stayed at was a bit too tortured for dinner. And as this was not a working trip (don’t worry IRS, I have not written this off!) we didn’t venture out of the hotel to eat once, although we did go fishing. So I can’t comment to much on the food of the Mexican Riviera per se. I can say that when its done right, Mexican food can be extremely tasty and I hope to explore that in the future.

Wednesday, November 08, 2006

Poached Egg Heck


NYER2LONDON, having seen my excellent article on soft boiled eggs, asks if I have any tips on poached eggs. She does not want to buy an egg poacher, and I agree that unless you are totally gadget obsessed, or you make a lot of poached eggs, that this is something that will just take up space. Poached eggs, a necessary component of eggs Benedict, can be a pain to make at home, as the whites tend to become a runny, goopy mess. I have to admit being at a loss for an answer, so I checked the bible: Julia Child's The Way To Cook. Her first recommendation was to use farm fresh eggs as these will poach easily with no extra work. Of course, unless you live next to a farm, this is not the easiest thing to do. I will give a shout out here to Hautboy Hill Farms (no website, but located at 39 Hautboy Hill Road, Cornwall Hollow, CT 06759 Tel:(860) 672-4495) which sells excellent, thick shelled brown eggs in Connecticut only.

There seem to be three things you can do if you are stuck with older eggs. This means any eggs you buy at the store. The first is to pierce a hole in the fat part of the shell with a pin and boil the egg for 10 seconds prior to poaching. This releases the air and allows the egg to coagulate somewhat prior to poaching. The second is to add vinegar, 1 1/2 tablespoons per quart of water. The third is to use the dreaded poacher. I tried the first two things alone and together to see what would help.

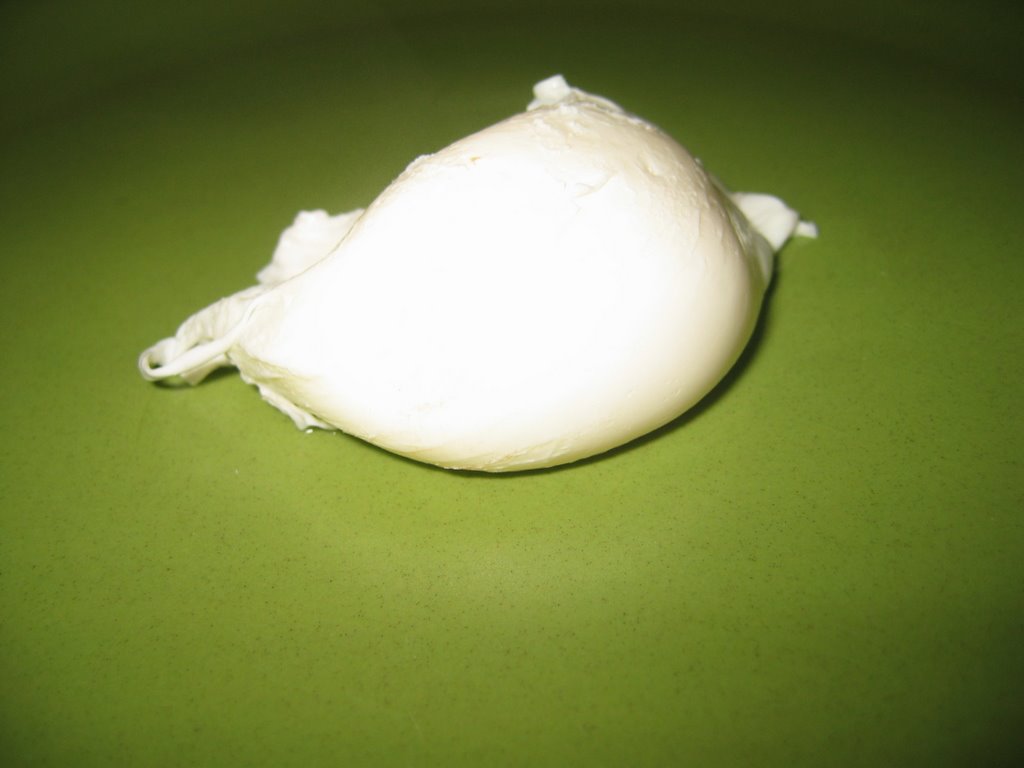
The pin-prick method did not seem to help very much. I even tried keeping the egg in the water for 20 seconds and still ended up with a feathery, goopy white. Vinegar definitely helps the shape of the egg. The photo above is of an egg cooked in vinegar. The problem is that you need so much vinegar clearly affects the taste of the the egg. You can taste the chemical coagulation caused by the acidity. So if I were prepping for a magazine I would use it, and eggs prepared this way may be tasty enough in a heavily flavored egg dish, such as hollandaise rich eggs Benedict.

It seems the best option may be to head for the farm. Since I don't live near one either, I will try to boil the eggs in shell for 60 seconds prior to poaching and see how this works. I will follow up on this later.