Showing posts with label dessert. Show all posts

Wednesday, August 13, 2008

The Van Leeuwen Artisan Ice Cream Truck


I've noticed more trucks selling food here on the Upper West Side. First there were the "Halal" trucks, such as the one on 86th and Broadway near the Citibank. Then there was the "Treat Truck," which, like a ghostrider, makes an occasional, unexpected stop near Barnes and Noble on 83rd Street. And now, in front of Zabar's, comes The Van Leeuwen Artisan Ice Cream Truck, which sells, well, you know what it sells.

This truck clearly is not Mr. Softee. No jingle, for one. Second of all, they have a very fancy collection of flavors, including Giandujia, which is something with hazlenut. OK, the something is Michel Cluziel chocolate, which I stated was one of the few chocolates I really liked some months ago. They are more expensive than Mr. Softee, with a small cone/cup going for $3.95. In addition to their fancy flavors, they also have vanilla, chocolate and mint chip. In fact, if you go to their website, you can see all of their flavors, as well as when and where their trucks will located.

The real question is how good is the ice cream. I sampled the wares of the truck with two other people, who wish to remain anonymous (no, it was not the lovely wife). The answer is quite tasty, but there could be some improvements. I tried the mint chip, which I thought was a bit icy. The mint was pleasantly subdued, but the Michel Cluziel Chips lacked a certain crispness. The other flavors we sampled included chocolate, currants and cream, and ginger. The overall consensus was that the ice cream was good, but could have been creamier and a bit more strongly flavored.

I think its clearly worth going back to the truck and seeing how things are going there. Although not cheap, its a good cone that you get for $4, as opposed to Grom, which was way more for way less ice cream. Ironically, I thought that Grom's ice cream was too creamy and too strongly flavored, proving that I am probably a pain in the butt in general. Final verdict: worth a try, but not a repeat if you don't like what you first had.

Let me know if you tried, and if you liked!
Also, leave me a post if you see any other trucks here on the Upper West Side.

Monday, July 28, 2008

Greetings From Naples, Maine: The Lakeside Dairy Bar


Ice cream in Maine.  Two great things that go great together.  And if you're in the Lake District, along route 302, its defintely worth your while to stop at The Lakeside Dairy Bar (on route 302 in Naples, telephone (207) 693-3090.  Its on your right side past the Marina as you drive from Portland).  The Lakeside Dairy Bar has all of the usual "Dairy Barn" style ice cream treats, only better.  There is a blizzard equivalent, which I had with soft serve vanilla and Andes Candies.  The lovely wife had cherry chip and coffee in a cup, both of which she enjoyed.  It was a long line, and we chatted with several people, many who have been coming back for years.  If you're in the Lake District for sleep away camp visiting weekend, its clearly worth a stop at the Lakeside Dairy Bar.

Monday, February 04, 2008

Bacon Flavored Chocolate

I am not making this up. As I am writing this, I am staring at Mo's Bacon Bar, which consists of 41% milk chocolate combined with pieces of applewood smoked bacon and alder wood smoked salt. It is made by a company called Vosges Haut Chocolat, which has a store in New York in Soho (132 Spring Street: 212-625-2929). If you go to the site, you can see that, in addition to bacon, Vosges sells a large variety of exotic chocolates, including such flavors as green tea, chiles and ginger. They also sell exotic truffles, chocolate henna: well you get the idea.

The real question is: how does it taste? Fortunately, I received my bar as a wonderful housewarming gift for the Superbowl. From a Pats fan, no less (other than that, my New England friend, you are perfect). So after trying the chocolate, I passed it around to some of the other people in my house to get an answer. And the consensus is "cute idea, poor execution." The chocolate flavor is overwhelmed not by the bacon, which is sort of a crunchy aftertaste, but the salt, which is overpowering. The chocolate is ok, but there is better out there. I thought there was sort of a greasy taste to the whole thing.

I have nothing against "two great tastes that go great together." But in this case, three is a crowd. I am going to stick with straight chocolate for now. And straight bacon. And straight salt. But I will see my cardiologist soon.

Wednesday, January 09, 2008

Really Good Coconut Cookies


I bought these cookies at Kam Man, the Chinese Super Market located at 200 Canal Street (near Mulberry). It was pretty much a random purchase: they came in an attractive package, they had a variety of flavors (although I bought the coconut). The cookies are manufactured in Malaysia by a company called "Ever Delicious." It may be the first time I bought something from Malaysia that wasn't a pair of sneakers. If it matters to you, the fact that its Halal also means its lard free (although I guess it could be full of lobster).

It turns out the cookies are delicious. Light and crisp, not to sweet, and with a distinct but not overpowering coconut flavor. They were a 4/4 thumbs up at our household. Look for them, and if you try any other flavors, let me know.

Friday, October 26, 2007

Really Pretty Good Banana-Granola Muffins


You can stop smirking. I made this recipe several times, and I have to say, its really good, considering what it is. The impetus behind this was the bake sale sponsored by Boy 1's class at school. After some discussion, I decided it was better to bake ourselves rather than buy baked goods and donate them. However, our kids school is, as they say "nut free," at least as it applies to legumes and tree nuts. I wanted to make something that would last the whole day, and I didn't want to bake a chocolate based item. And thus banana-granola muffins were born. Starting with a recipe from the Joy of Cooking and significantly changing the proportion of ingredients: butter (more is better), amount of bananas (more is better) and sugar (less is better) I came up with an easy, reproducible recipe that you can feed to your health conscious friends to lure them into a false sense of security before whipping out the bacon.

INGREDIENTS

6 bananas
1 cup "breakfast" granola, chopped a bit in a food processor

1 3/4 sticks butter
1 cup and two tablespoons of sugar

1 teaspoon baking soda
1 teaspoon baking powder
1 1/2 teaspoons salt
2 1/2 cups flower (measured a bit heavy)

2 eggs and 2 egg whites (use a third egg if the eggs are on the smaller side)

EQUIPMENT YOU WILL NEED

Food processor
Muffin pan, lightly greased

INSTRUCTIONS:

Preheat oven to 350 degrees.

Mix together the flour, salt, baking powder and baking soda in a bowl.

Add the butter and sugar to the food processor with metal blade in. Mix together until you form a well mixed paste of these items. Add the dry ingredients to this and mix together. Add the eggs and mix thoroughly. Crush three bananas a bit with your hand and mix those in thoroughly, too. Crush the other three bananas and add these and the granola and just mix to distribute these ingredients in the batter.

Pour the mixture to just below the top of the muffin tins. There will likely be a bit left over, which you can use with a second tin or make a thin "muffin top" in with a pie tin (this cooks in 15 minutes, tops).

Place in the oven. The cooking time is estimated to be about 25 to 30 minutes in my oven. In general they are ready when they look light brown in a uniform manner. Cool a bit before removing them from the tins.

Sunday, October 21, 2007

What's With The Mochi???


Ah. Pulverized, glutinous sticky rice surrounding a ball of ice cream. What could be better? Well, it turns out a lot of things are better, but many things are in fact worse. We went to our "somewhat" uptown friends house for dinner last night, and after some chicken from Pio-Pio (more on this in a future post), we were ready for dessert. Besides more traditional ice cream, our friends had procured some mochi ice cream from a local market, which still exist on "somewhat" upper Broadway.

I think mochi tastes like edible latex. Rubbery, chewy, and a bit on the tasteless side. And sticky, too. None the less, there is a large tradition surrounding the stuff, including a ceremony called Mochitsuki where the stuff is made. Having said that, last I learned that not all mochi, and certainly not all mochi ice cream, is equal.

Although originally created by the giant megacorporation Lotte, mochi ice cream is now available in the US from a variety of producers. In fact, the Lotte brand we had last night was clearly inferior to the mochi ice cream distributed by the somewhat smaller megacorporation Sanwa. It was also more expensive.

All in all, I'm not running back for more mochi. But it is an interesting dessert, and it does look cool on a plate.

Thursday, October 18, 2007

Pinkberry Coming to The Upper West Side


Oh the excitement in the Male Martha Household! Not from me, who likes Pinkberry,but could easily either live without it or on Za*Berry at Zabar's, but from the Lovely Wife, who craves the white and green stuff. Pinkberry is starting to really spread: this will be their sixth store in New York City. The store is located on Broadway between 70th and 71st Streets. I'll let you know when it opens.

Sunday, July 29, 2007

Pineapple Dessert: Yeah You Can Use Malibu Rum, Too!


It was another Saturday night in Fire Island. Although many of us were not around, thanks to visiting day at camp in the Adirondacks, some of us were. After trying a variety of commercial prepackaged ribs (take home tip: do not do this yourself, they were gross) we settled down to dessert: yet another pineapple dish. Dan, who discovered the pineapple dessert we used as a basis for this current recipe, didn't want to use tequila again. I suggested rum, and Dan countered with Malibu Rum (Did you know that Malibu Rum was made in the tropical country of Canada?). The lovely wife suggested we use a bit less sugar than we did last time, as Malibu Rum has some already. The results: pina-colada-riffic!

INGREDIENTS

Large pineapple, peeled and cut into 3/4" slices. You can core it, but, yet again, we did not.
1 cup coconut Malibu Rum, or more
1/2 cup brown sugar
1 1/2 teaspoons vanilla
1/2 teaspoon cinnamon

ice cream

EQUIPMENT YOU WILL NEED:
Hot clean grill, with minimal flame or grease

INSTRUCTIONS

Mix the rum, sugar, vanilla, and cinnamon together until dissolved. Place pineapple on grill. Baste the mixture while grilling. Be careful to avoid burning with the sugar and tequila. Takes about 15 minutes if not done on a high heat. Serve with ice cream or plain.

Thursday, July 05, 2007

Dan's Famous Pineapple Dessert Thing


I admit it: this recipe is all Dan, the Gadgetoff Man. In fact he got it from a guy named Dan Riches, who has recipes galore on About.com. The recipe is a variation on grilled pineapple that he found in the other Dan's About.com section. Our Dan simplified the recipe a bit, by not coring the pineapple and also increased the amount of tequila significantly. He also cooked the fruit over a lower heat, which stopped all the sugar in the recipe from burning. Although I only have a photo of the pineapple itself, we did decorate it with whatever ice cream we had in the house, and it was good.

INGREDIENTS

Large pineapple, peeled and cut into 3/4" slices
1 cup tequila, or more
3/4 cup brown sugar
1 1/2 teaspoons vanilla
1/2 teaspoon cinnamon

ice cream

EQUIPMENT YOU WILL NEED:
Hot clean grill, with minimal flame or grease

INSTRUCTIONS

Mix the tequila sugar, vanilla, and cinnamon together until dissolved. Place pineapple on grill. Baste the mixture while grilling. Be careful to avoid burning with the sugar and tequila. Takes about 15 minutes if not done on a high heat. Serve with ice cream or plain.

You can go to Derrick's About.com site for all kinds of information about barbecue recipes, tools and tips.

Thursday, June 28, 2007

I Finally Tried the Gelato at Grom


I am not the best person to review dessert. Although I like the sweet stuff, I admit to not seeing the subtleties of presentation and flavor that many aficionados do. None the less, I was impressed with the perpetual long lines that I had seen outside of Grom, the Italian gelato transplant now located on 76th and Broadway. Its been open for a while, but, because of the lines, I refused to go. This finally changed yesterday.

There were three people in line, the least I had seen. So I decided to give it a whirl. I ordered a small cone ($5.14 with tax!!!!!) of their flavor of the month: fiordilatte and menta. While I admit that the gelato was extremely creamy and smooth, it also tasted like toothpaste. Very expensive toothpaste. Perhaps other flavors are better.

So while I will probably stop to try some other flavor at some other time, and welcome the chance to go with some one who wants to go, I am still wondering if its a bit of the emperor's new clothes. I still like Emack and Bolio's better

Thursday, May 31, 2007

I Finally Ate at GROM

I am not the best person to review dessert. Although I like the sweet stuff, I admit to not seeing the subtleties of presentation and flavor that many aficionados do. None the less, I was impressed with the perpetual long lines that I had seen outside of Grom, the Italian gelato transplant now located on 76th and Broadway. Its been open for a while, but, because of the lines, I refused to go. This finally changed yesterday.

There were three people in line, the least I had seen. So I decided to give it a whirl. I ordered a small cone ($5.14 with tax!!!!!) of their flavor of the month: fiordilatte and menta. While I admit that the gelato was extremely creamy and smooth, it also tasted like toothpaste. Very expensive toothpaste. Perhaps other flavors are better.

So while I will probably stop to try some other flavor at some other time, and welcome any postings from people who had a positive experience, I'm sticking with Emack and Bolio's. Their mint flavors taste like mint.

Saturday, April 07, 2007

Julia Child Chocolate Mousse: With Commentary!

I usually post original recipes, but sometimes even a great recipe from someone else needs a little more explanation. NYER2LONDON recently commented that she made the same chocolate mousse from Julia Child's "Way to Cook" that I did and had some problems combining the ingredients. I reviewed the recipe on page 451 of the soft cover edition, and decided it needed a bit more explanation than Julia gave in the book. Towards this end, I am being very specific on the types of bowls used, The mixing method, etc. as it seems to play a role in how the final product looks. The only difference in ingredients between my recipe and the Julia recipe is that I used normal table sugar and not "instant" sugar. The recipe is also doubled in size. To make this recipe, you really need a lot of cookware, bowls and gadgets in your kitchen.

INGREDIENTS

16 ounces semisweet baking chocolate (this tastes better than sweet)
12 tablespoons (1 1/2 sticks) softened unsalted butter
1/2 cup strong coffee (I used Zabar's house blend this time, but prefer Mocha in general)
6 egg yolks
6 egg whites
2 cups heavy cream
1/2 cup sugar

EQUIPMENT YOU WILL NEED

electric hand mixer (this is key)
2 bowls for separated egg whites/yolks
metal bowl for mixing whipped cream
larger bowl that the metal bowl can fit in to put ice
double boiler
really large bowl for egg whites that will eventually hold everything
whisk

INSTRUCTIONS

There are actually several steps that need to be done separately and then everything is combined.

The first step is to seperate the eggs, make sure the butter is soft and ready, and have the coffee. I believe its worth using hot, fresh coffee.

STEP: Whip the cream. Use the hand mixer. It should be somewhat stiff, but not over whipped. Put the cream in a metal bowl that is inside an ice filled regular bowl.

STEP: Melt the chocolate in the double boiler. Add the coffee. Add the butter, and then add the egg yolks. Julia says you should add them one by one, but for those of us who break the yolks, by the spoonful works just fine. Make sure everything is well mixed and silky smooth. Let this simmer. If you want, put a thermometer in and make sure its over 160 degrees for a bit. This will kill the bacteria.

STEP: beat the egg whites with a hand mixer until they form soft peaks. This seemingly takes forever. Then add the sugar, spoonful by spoonful. Keep beating until stiff peaks are formed. Despite beating and beating, I never really get those stiff peaks but I do come close. I think that doing this step successfully is the key to this recipe.

FINAL STEP: Add the chocolate mix to the egg whites. Use the whisk. (NOT IN THE RECIPE BUT...you can do this over a bit of heat and make sure the entire mixture goes to 160 degrees for a bit if you are worried about bacteria). When its pretty combined looking, add the whipped cream. Use the whisk to fully combine everything. Place in ramekins, coffee cups, etc. and cover with plastic wrap. Its best to let it chill for many hours, and I usually make this the night before I serve it. Add whipped cream if you want.

Sunday, April 01, 2007

Nielsen Frozen Custard: Finally Something to Eat in Saint George, UT


I'm actually back in New York as I write this, but I couldn't leave Utah without mentioning the one truly excellent place we ate: Nielsen Frozen Custard. Nielsen's sells true frozen custard, the thickest "soft" ice cream you will ever eat. Available in both vanilla and chocolate (daring in this part of the country), Nielsen is justifiably famous for its "concrete:" a mix in of their custard and things such as Oreos. They also sell pints and quarts of their custard to go. Like everything else in this part of the country, Nielsen is a chain, albeit a small one. We were told by the manager that the one in St. George is their second store. They also have locations in Salt Lake City, Henderson, NV and other places. No web site though.

Tuesday, March 06, 2007

Things To Do Around MSG: Pinkberry

First, a bit of truth. We didn't go to Pinkberry after a Rangers game. We actually went while waiting to pick up the boys at a NY Titans Professional Indoor Lacrosse Game. As a side note, the captain of the Titans should have given boy #2 an autograph: it would have saved me a lot of grief and I may have actually bought tickets in the future. But enough on that.

While we were waiting, the lovely wife and I got in the long line at Pinkberry, the tart frozen yogurt sensation from Los Angeles. There are now three of them in New York as well. Of course we went to the one near the Garden, in Korea Town, on 32nd Street between 5th and Broadway.

The first thing the lovely wife and I noticed was the crowd. The line literally reached out the door, and we were noticeable both because of our age (everyone else looked like they couldn't buy a drink legally) and because we weren't Korean or of Korean ancestry. Like many other customers, we were on a date. I snagged one of the few plastic seats and tables while the lovely wife waited on line. The line moved, and we got our yogurt within 15 minutes.

Pinkberry has only two flavors of yogurt, green tea and plain. There are three sizes of cups. We, like many other couples, split a large one. Like everyone else, we went for the plain yogurt. You get to choose a wide variety of toppings, including such things as fruit, Fruity Pebbles and Captain Crunch (see photo), which many reviewers have made a big deal of. These reviewers clearly do not have children at home; otherwise they would realize that Captain Crunch is a condiment almost as useful as ketchup.

The lovely wife really liked Pinkberry. As others have noted, the yogurt is tart, and reminded me of authentic Greek yogurt. I liked Pinkberry as well, although it needed Captain Crunch to make it sweet enough for me to enjoy.

After an event at MSG, I would strongly consider going to Pinkberry for dessert. I'm not sure the kids would like it much, however, and I would only go with adults.

Tuesday, December 26, 2006

"The Sweet Life" Chocolate Chip Cookies


Every year, I get a cookbook for the holidays. And every year, I actually read it and usually try out recipes. This year I received "The Sweet Life," by Kate Zuckerman, the pastry chef at Chanterelle. Since I have been obsessed with candy recently, and even occasionally with cake, I was excited about this book. I usually try a recipe I can't screw up as a first pass on any cook book I buy, and this one was no exception: chocolate chip cookies.

Before continuing, I should point out that I have NO preconceived, mythical chocolate cookies to remember. I grew up kosher, and in a house where food was made to be frozen. So I feel I have a pure heart, having no memories of any of mythical cookie to which to compare all other cookies too. I have no axe to grind. Having said that, these cookies were way to sweet out of the oven. But, while I slept, a transformation occurred. Overnight, they became totally different cookies. Crisp, with a bit of chew, they were still a bit sweet, but had a truly excellent texture. The sweetness will be adjusted out with the next batch. It may have been the first batch of cookies I ever made that actually tasted better 5 days after baking than fresh out of the oven (and they were still good 5 days after baking)

Technique and professionalism seems to be the themes of this book. The cookie recipe reminded me that Ms. Zuckerman is a professional chef, creating dishes that are mostly prepared early in the day for use much later. She does give a large number of helpful tips, such as when to use warm eggs and how to brown butter. These may end up being more valuable to me as a home cook than the complicated (but beautiful) recipes. I have to admit being a bit scared of the more complicated recipes, but a dedicated dessert maker could do some damage to their friends and families waistline (do you hear me, Cindy?)

The themes of pre-preparation and technique are kept up in her section on souffles, where Ms. Zuckerman describes techniques for making the souffle' "batter" in such a way that it will sit in the fridge for hours until ready to be cooked at the last minute. Although I am terrified to try, as I do not respond well to kitchen failure, I actually have a desire to try the chocolate souffle', which she says will sit uncooked in the fridge for four hours (or the freezer for 24) prior to use. Although it would still be an all day affair to produce this dessert, at least I would have time in the middle to make the main course! I will serve it with commercial ice cream however. After reading her book, I do not feel it is worth it to try to compete with commercial ice cream producers with my home equipment. And, as for cookies, I'm sticking to Joy when eating them that night. But I will be making "The Sweet Life's" Milk Chocolate Crunch Candies as soon as I break my New Year's resolution diet.

Chocolate Chip Cookie Recipe (simplified a bit my me, and I cut the sugar a bit)

INGREDIENTS

1 1/4 cups light brown sugar (she uses 1 1/2 cups)
2 Sticks butter, softened
1 egg, room temperature
1 egg white at room temperature
1 teaspoon baking soda
1/4 teaspoon salt
1 3/4 cups flour
8 ounces semisweet chocolate chips
1/2 teaspoon vanilla

EQUIPMENT YOU WILL NEED

Mixer (she says standing mixer with flat blade, but I made with ancient hand held Black and Decker)
Cookie Sheets (3 or 4 as these cookies will spread when cooked)

INSTRUCTIONS
Preheat oven to 350 degrees and grease up cookie sheets.

Mix together flour, salt and baking soda in a separate bowl and set aside.

Cream the butter and sugar together with mixer until fluffy and light. Add eggs and egg white and keep mixing until batter looks glossy. Add dry ingredients and fold together for one minute. Mix until combined. Add chocolate chips and walnuts and mix 30 seconds. (MM note: it is really important to do this fast or the baking soda will lose all its fizz and your cookies will be to flat). Place onto cookie sheet in heaping teaspoon sized balls. They really flatten out so really try not to have more than 12 on a sheet or you will have a sheet of cookies. Quickly put in oven and bake 12 to 15 minutes until light brown with brown edges. I tried cooking them longer for a more caramelized look, but personally did not like them as much this way. Cool on racks.


Thursday, October 12, 2006

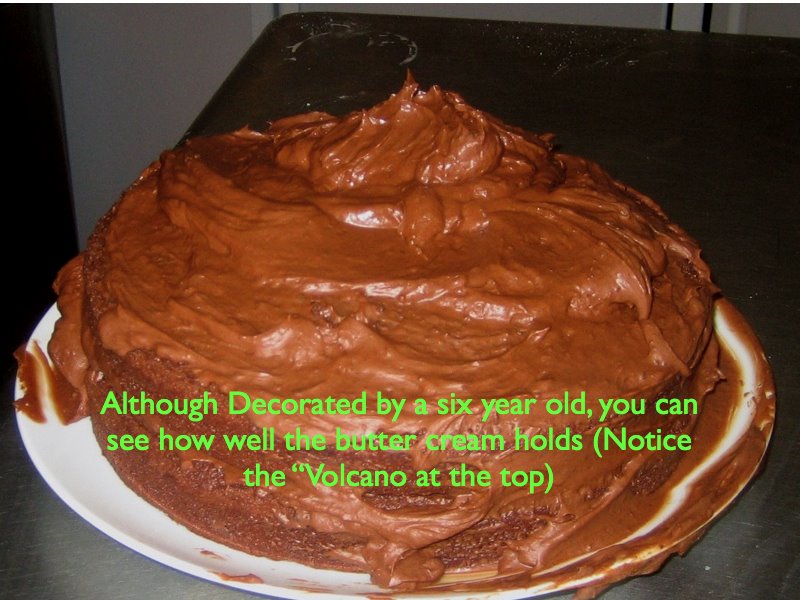
Butter Cream Icing (Chocolate)


I have always hated Duncan Hines Icing from a can. It tastes like over sweet chemicals. Its also a pain to put on the cake. So I was determined to make my own. My favorite icing is on the cupcakes at the Cupcake Cafe in New York. I wasn't going to make anything that attractive, but I did want a tasty, heavily buttered butter cream. I always use Joy Of Cooking as a start for desserts. Their recipes are pretty good for them, if always over sweet. The following recipe is a variation of the "Joy" one. I cut the sugar in the final product, added more butter and used a bit less egg. So I claim it as my own.


You need a lot of stuff to do this. (Don't ask about the cleanup). Besides the double boiler for melting chocolate, you need a stainless steel bowl which you will have to put in a simmering water bath and then an ice water bath. The reason to put it in the simmering water is to heat the raw egg yolks to a temperature of 160 degrees Farenheit, pastuerizing them. The cool water bath helps you when you mix the butter cream, chocolate etc. from turning into soupy goo.

INGREDIENTS

1 cup sugar
1/2 cup water
1/4 teaspoon cream of tartar
(see what this actually is)
4 extra large or jumbo egg yolks
3 1/2 sticks unsalted butter, warm and soft and cut into tablespoon size pieces
10 ounces unsweetened chocolate (use a rich one like Ghirardelli)


KITCHEN EQUIPMENT YOU WILL NEED

Candy Thermometer
Instant Read Thermometer (the one you use for meat, preferably digital)
Decent pot for boiling sugar (not to large)
Stainless steel bowl
A bowl bigger than the stainless steel bowl which can hold ice, water and the stainless steel bowl
A Pan you can fill with water and put the stainless steel bowl in (that bowl goes a lot of places)
Electric Hand Mixer
Double boiler
Whisk

INSTRUCTIONS

Measure out all ingredients and have them ready. Beat the yolks until stiff in the stainless steel bowl. Put about an half an inch of water in the large skillet (there should still be room to put in the bowl without spilling) and place this on the stove on simmer.

Put the water, cream of tartar and sugar in the pot. Slowly boil the water, and then increase the boil. Stir a bit, but don't worry to much. The candy thermometer will attach to the side of the pot. Watch it. When the temperature reaches the "softball" stage (240 degrees F) turn off the heat and put aside.

Quickly re-whisk the yolks. While beating, add the sugar syrup to the side of the bowl. While beating, put the stainless steel bowl in the simmering water and put the regular cooking thermometer in with it. Keep whisking. When the temperature reaches 160 degrees, remove the bowl from the heat.

Let the mixture cool. Start beating with the electric mixer (on say, medium). Place the bowl in the ice water bath, Add the soft butter, one tablespoon at a time. Don't worry if it becomes a little soupy, the cool bowl will help. If its really goopy, stop for a bit and let it cool. Beat with the mixer like you would beat whip cream. It actually starts to look like that. When its smooth and spreads, its ready to add the chocolate too.

Melt chocolate in the double boiler. Add this to the butter cream mix and beat in with the electric mixer until it

Butter cream spreads easily at room temperature and its easy to decorate a cake. You may have to have it a bit cooler to make a pattern.